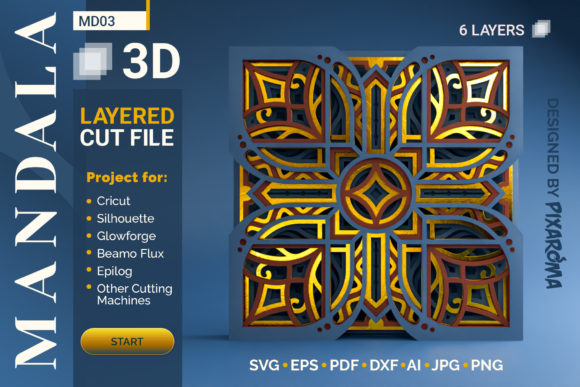
Mandala MD03 3D Layered SVG Cut File
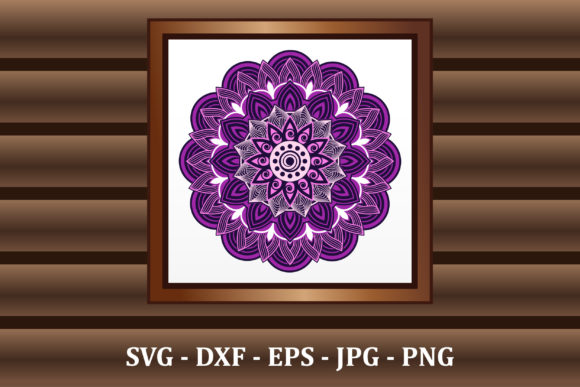
Crafting a stunning 3D shadowbox mandala is one of the most rewarding projects for both hobbyists and professional designers. The Mandala MD03 3D Layered SVG Cut File offers a sophisticated 6-layer design that transforms flat digital inputs into tangible, dimensional art. However, the difference between a mediocre craft project and a gallery-worthy piece often comes down to how you handle the assembly process. Many creators rush through the cutting phase but stumble when it comes to layering, resulting in a flat appearance that defeats the purpose of buying a layered SVG file.
This guide explores how to maximize the potential of the Mandala MD03 file, highlighting common pitfalls and providing practical advice on materials, spacing, and assembly techniques. Whether you are using cardstock, plywood, or acrylic, understanding these nuances will ensure your final product has the depth and impact intended by the designer.
Understanding the Mandala MD03 Design
The Mandala MD03 is not just a single image; it is a complex composition broken down into six distinct layers. This structure allows for intricate shadow effects and visual depth. When downloaded, the file typically includes separate SVG paths for each layer, which must be cut individually. The beauty of this format lies in its versatility. It can be used as a standalone decoration or framed inside a complementary shadow box to enhance the artwork’s presence.
For beginners, the term "layered SVG" might seem intimidating, but it simply means that the design is segmented. Each segment corresponds to a specific depth plane. When stacked correctly, these planes create a parallax effect that draws the viewer’s eye into the center of the mandala. The key to success is respecting the integrity of each layer during the cutting and assembly phases.
Common Mistakes That Ruin the 3D Effect
One of the most frequent errors seen in community crafting groups is the improper use of adhesives. A critical rule to remember is: do not use glue alone. If you apply liquid glue directly between layers, the paper or material absorbs the moisture, causing warping and flattening. More importantly, glue creates a zero-gap bond, eliminating the air space necessary for shadows to form. Without that shadow gap, your beautiful 6-layer design collapses into a flat silhouette, losing all dimensionality.
Another common oversight is ignoring the orientation and order of the layers. The provided guide usually indicates a specific stacking sequence, often from largest background layer to smallest foreground detail. Mixing up this order can result in intricate details being hidden behind larger shapes, creating a muddy visual experience rather than a crisp, layered look. Always verify the layer hierarchy before applying any adhesive.
Selecting the Right Materials and Spacers
The material you choose significantly impacts the final aesthetic and the ease of assembly. For those working with cardstock, precision is paramount. Standard printer paper is too thin and may tear under the weight of multiple layers. Instead, opt for heavy-weight cardstock (at least 80lb) to ensure structural integrity. To achieve the desired 3D look, use double-sided foam dots, tabs, or tape between each layer. These spacers create consistent gaps that allow light to pass through, casting realistic shadows.
If you are aiming for a more durable or modern aesthetic, consider using plywood or acrylic. Wood layers require different spacing solutions. Acrylic foam spacers or wooden dowels work best here because they provide rigid support without compressing over time. Foam tape can also be used for wood, but ensure it is thick enough to prevent the layers from touching. Remember, the goal is to maintain a uniform distance between all six layers to keep the perspective balanced.
Why Spacer Thickness Matters
- Consistency: Uneven spacers lead to a tilted or wobbly final product, which looks unprofessional.
- Shadow Depth: Thicker spacers create deeper, more dramatic shadows, while thinner ones offer a subtle lift. Choose based on your lighting environment.
- Material Compatibility: Some adhesives react poorly with certain materials. Test a small section first if you are using unconventional media like vinyl or metal foil.
Step-by-Step Assembly Best Practices
To avoid frustration, prepare your workspace carefully. Lay out all six cut layers in order before applying any adhesive. This "dry run" allows you to check for alignment issues or missing pieces. Once you are confident in the layout, begin assembling from the back layer forward.
- Download and Organize: Ensure you have the correct file format compatible with your cutting software (e.g., Cricut Design Space, Silhouette Studio).
- Cut Carefully: Use sharp blades appropriate for your material. Dull blades can leave rough edges, making alignment difficult.
- Apply Spacers: Place foam dots or tape on the corners and center of each layer. Avoid placing adhesive too close to the outer edges where it might squeeze out and stick adjacent layers together.
- Stack Sequentially: Align each new layer precisely with the one below it. Use tweezers for small, delicate pieces to avoid fingerprints and misalignment.
- Final Inspection: Check for any visible glue seepage or uneven gaps. Make adjustments immediately while the adhesive is still tacky.
Evaluating Your Choice Before You Buy
Before purchasing the Mandala MD03 SVG file, take a moment to review the preview images and customer feedback. Look for comments regarding the clarity of the layer separation and the quality of the vector paths. A high-quality SVG should have clean lines without unnecessary nodes that could confuse your cutting machine. Additionally, check if the package includes a PDF guide or tutorial. Having visual instructions can save hours of trial and error, especially for complex designs.
Consider your end goal. If you plan to sell these items, ensure the file license permits commercial use. Many creators overlook this detail, leading to legal complications later. For personal use, focus on the complexity level. The Mandala MD03 is moderately complex due to its 6 layers, so ensure you have the patience and precision required for such detailed work.
Enhancing the Presentation
Once assembled, the Mandala MD03 can be displayed in various ways. A simple frame with a deep profile works well, but a dedicated shadow box adds an extra layer of professionalism. The empty space behind the layers allows light to filter through, emphasizing the 3D effect. For a dramatic presentation, place the mandala against a contrasting background color or illuminate it from behind with LED strip lights.
Remember that the value of the Mandala MD03 lies not just in the digital file, but in the craftsmanship applied to it. By avoiding common mistakes like using glue instead of spacers, selecting appropriate materials, and following the correct assembly order, you can create a piece that stands out. This approach ensures that your investment in the digital file translates into a high-quality physical product that delights both you and your audience.
Whether you are a seasoned crafter looking to expand your portfolio or a beginner eager to try your hand at 3D papercraft, the Mandala MD03 offers a fantastic opportunity to experiment with depth and light. Take your time, pay attention to the details, and enjoy the process of bringing this intricate design to life.